The Ultimate Fitted Hat Size Chart: Find Your Perfect Fit

When it comes to wearing hats, there’s nothing worse than a hat that doesn’t fit properly. Whether it’s for fashion, sports, or just to keep the sun off your face, a fitted hat should feel snug but not too tight. Luckily, we’re here to help you find the perfect fit! This guide includes an easy-to-use hat size chart along with tips to measure your head correctly. Why Proper Fit Matters A properly fitted hat not only looks great but feels comfortable too. Here are some reasons why fit is important: Comfort: A too-tight hat can give you headaches, while a loose one might fly off in the wind. Style: A well-fitting hat enhances your overall look. Support: Some hats provide sun protection or warmth. If they’re not fitting correctly, they may not serve their purpose well. How to Measure Your Hat Size Before we dive into the size chart, let’s talk about how to measure your head. Follow these easy steps: Gather Your Materials: Get a flexible measuring tape. If you don’t have one, you can use a piece of string and a ruler. Position the Tape: Place the tape around your head, just above your ears and eyebrows. Take the Measurement: Make sure the tape is snug but not tight. Write down the measurement where the tape meets. Hat Size Measurement Tips Measure Twice: It’s a good idea to take two measurements to ensure accuracy. Use the Right Tape: A fabric measuring tape is best, as it can easily move around your head. Fitted Hat Size Chart Now that you’ve got your measurements, it’s time to find your size! Below is a fitted hat size chart that includes sizes in inches and centimeters. Hat Size Circumference (Inches) Circumference (Centimeters) XS 20.5 – 21 52 – 53 S 21 – 21.5 53 – 54 M 21.5 – 22 54 – 56 L 22 – 22.5 56 – 57 XL 22.5 – 23 57 – 58 XXL 23 – 23.5 58 – 60 XXXL 23.5 – 24 60 – 61 Understanding Sizes XS: Extra Small is perfect for smaller head sizes. S: Small usually fits young teens and smaller adults. M: Medium is the most common size for adults. L: Large fits those with bigger heads. XL and above: Extra Large sizes cater to even larger head sizes. Types of Fitted Hats There are several different styles of fitted hats you might come across. Here are some popular types: Baseball Caps: Often used in sports. Beanies: Knit hats that are perfect for winter. Snapbacks: Adjustable hats that are stylish but not always fitted. Flat Caps: These are more formal but can come fitted as well. Tips for Buying Fitted Hats When shopping for fitted hats, keep these tips in mind: Try It On: If possible, always try on the hat before buying. Check the Material: Some materials stretch over time, while others do not. Know Your Style: Choose a style that reflects your personal taste. Where to Buy Fitted Hats Fitted hats can be found in a variety of places: Sporting Goods Stores: Great for sports team hats. Fashion Stores: Look for stylish options. Online Retailers: Websites like Amazon and eBay often have a wide variety. Online Shopping Tips Check the Return Policy: If you’re unsure about the fit, look for stores with easy returns. Read Reviews: Customer feedback can help you gauge if a brand runs small or large. Conclusion Finding your perfect fitted hat isn’t as complicated as it may seem. By measuring your head correctly and understanding the size chart, you can easily find a hat that not only looks great but feels comfortable too! Remember, your head might fit differently in various styles, so don’t hesitate to try on different hats or check multiple brands. Key Takeaways Measure Accurately: Use a flexible measuring tape. Use the Size Chart: Refer to the chart above for sizes. Choose Your Style: From baseball caps to beanies, find what fits your personality. By following this guide, you’ll be set to rock your fitted hat in no time. Happy hat hunting!

Mastering Math: How a Multiplication Chart 1-100 Can Boost Learning

Math can sometimes feel like a mountain to climb, especially when it comes to multiplication. However, a simple tool called a multiplication chart can make this journey much easier! In this blog post, we’ll explore how a multiplication chart from 1-100 can enhance learning, help students understand multiplication, and provide tips for effective usage. What is a Multiplication Chart? A multiplication chart is a visual tool that shows the results of multiplying numbers. Typically laid out in a grid, the rows and columns contain numbers, and where they intersect, you can find their product. For example, if you want to know what 3 times 4 is, you look at row 3 and column 4, and where they meet, the answer is 12. Why Use a Multiplication Chart? Using a multiplication chart can significantly boost learning. Here’s why: Visual Learning: Many students learn better through visuals rather than just numbers on a page. Quick Reference: It provides instant answers, making it easier to check work. Reinforces Memory: Regularly using a chart helps reinforce multiplication facts in students’ minds. Encourages Independence: Students can solve problems on their own without always asking for help. Benefits of a Multiplication Chart 1-100 Simple Learning A multiplication chart helps break down complex concepts into manageable pieces. Here’s how: Understand Patterns: Students can see patterns in multiplication, such as how multiplying by 10 is just adding a zero. Faster Calculations: With regular practice, students learn to recognize products quickly without having to count or calculate. Builds Confidence Learning can be daunting, but a multiplication chart gives students the tools they need! Here are some ways it builds confidence: Easy Checking: If a student is unsure of their answer, they can reference the chart to double-check. Limit Frustration: Instead of stressing over calculations, students can focus on understanding the process. Practical Application Multiplication is used in daily life, from budgeting to cooking. A multiplication chart can help: Math in Real Situations: Students can apply multiplication to real-world examples. Prepare for Tests: It offers a solid base for tackling more advanced problems in the future. How to Use a Multiplication Chart Effectively Step-by-Step Guide Start by teaching students how to read and use the chart effectively. Here’s a simple structure: Locate: Find the first number in the left column (e.g., 3). Move Across: Go across the row until you find the second number on the top (e.g., 4). Find the Product: Follow that row to where it meets the column of the first number. Voila, you have your answer (12)! Practice Regularly To really master multiplication, practice is key. Here are some tips: Daily Drills: Set aside time each day for multiplication practice using the chart. Games: Incorporate fun games that involve looking up products on the chart. Example Multiplication Chart 1-100 Here is a simplified version of a multiplication chart for better understanding. × 1 2 3 4 5 6 7 8 9 10 1 1 2 3 4 5 6 7 8 9 10 2 2 4 6 8 10 12 14 16 18 20 3 3 6 9 12 15 18 21 24 27 30 4 4 8 12 16 20 24 28 32 36 40 5 5 10 15 20 25 30 35 40 45 50 6 6 12 18 24 30 36 42 48 54 60 7 7 14 21 28 35 42 49 56 63 70 8 8 16 24 32 40 48 56 64 72 80 9 9 18 27 36 45 54 63 72 81 90 10 10 20 30 40 50 60 70 80 90 100 Key Takeaways A multiplication chart provides a visual aid that simplifies learning. It boosts confidence by allowing students to check their work. Regular practice helps reinforce multiplication concepts and prepares students for more complex math. Conclusion Mastering multiplication is a crucial skill for students. A multiplication chart from 1-100 can turn this difficult task into a fun and engaging learning process. By visualizing multiplication, practicing regularly, and applying these concepts in real life, students can become math masters! So, whether you’re a teacher, parent, or student, consider using a multiplication chart as a valuable tool in the math toolkit. Happy multiplying! SEO Keywords Multiplication chart 1-100 Mastering math Math learning tools Benefits of multiplication chart Multiplication made easy

The Ultimate Ear Piercings Chart: Types, Placement, and Healing Times

Ear piercings are not just a way to wear jewelry; they’re a form of self-expression. From the classic lobe piercing to trendy cartilage piercings, knowing about different types, placements, and healing times can help you make the best decision. In this blog post, we’ll break everything down into simple sections for easy reading. Understanding Ear Piercings Ear piercings can be done in various areas of the ear, each with its unique name and healing time. Below, we’ll cover popular types of piercings, where to place them, and how long it usually takes for them to heal. Types of Ear Piercings Here’s a chart showing some of the most common types of ear piercings: Piercing Type Location Healing Time Lobe Bottom of the earlobe 6-8 weeks Cartilage Upper ear cartilage 3-12 months Helix Outer rim of the ear 3-12 months Tragus Small bump in front of the ear canal 3-6 months Daith Fold of cartilage above the ear canal 3-6 months Rook Inner cartilage ridge 6-12 months Conch Center of the ear 3-9 months Industrial Two holes connected by a single barbell 3-6 months Details of Each Piercing Type 1. Lobe Piercing Location: The fleshy part of the ear. Healing Time: 6-8 weeks. Common Jewelry: Studs or hoops. 2. Cartilage Piercing Location: Upper part of the ear. Healing Time: 3-12 months, depending on the type. Common Jewelry: Hoops, studs, or cartilage jewelry. 3. Helix Piercing Location: Outer edge of the ear. Healing Time: 3-12 months. Common Jewelry: Hoops or studs. 4. Tragus Piercing Location: The small, hard area in front of the ear canal. Healing Time: 3-6 months. Common Jewelry: Studs or barbells. 5. Daith Piercing Location: The fold above the ear canal. Healing Time: 3-6 months. Common Jewelry: Hoops or curved barbells. 6. Rook Piercing Location: The ridge of cartilage above the tragus. Healing Time: 6-12 months. Common Jewelry: Curved barbells or hoops. 7. Conch Piercing Location: The center of the ear shell. Healing Time: 3-9 months. Common Jewelry: Studs or large hoops. 8. Industrial Piercing Location: Two piercings connected by a single barbell. Healing Time: 3-6 months. Common Jewelry: Barbells. Factors Affecting Healing Times Aftercare: Proper care can speed up healing. Body Type: Individual healing rates may vary. Jewelry Material: Hypoallergenic materials heal better. Placement: Some areas are more sensitive than others. Aftercare Tips for Ear Piercings Good aftercare is essential for all types of piercings. Here are some tips: Clean Regularly: Use saline solution or a mild antiseptic. Avoid Touching: Keep hands away to prevent infection. Change Jewelry Sparingly: Wait until the piercing is fully healed. Recommended Ear Piercing Combinations Many people like to mix and match piercings for a unique look. Here are some popular combinations: Lobe + Helix: A classic combination with a mix of simple and trendy. Tragus + Daith: Great for a stylish look. Industrial + Conch: Perfect for a bold statement. Understanding Pain Levels Here’s a quick guide to how much each piercing might hurt, on a scale from 1 (least painful) to 5 (most painful): Piercing Type Pain Level Lobe 1 Cartilage 3 Helix 4 Tragus 3 Daith 4 Rook 4 Conch 5 Industrial 4 Final Thoughts Choosing to get an ear piercing is a personal choice and one that can look great with the right jewelry. Remember the healing times and aftercare tips, and always opt for a clean, reputable piercing studio. Key Takeaways Types of Piercings: Different options like lobes, cartilage, and industrial. Healing Times: Ranges from 6 weeks to a year. Aftercare Matters: Keeping it clean helps speed up healing. Pain Levels: Varies, so be prepared for a little discomfort! Whether you’re considering your first piercing or adding to your collection, understanding these aspects can make the process smoother and more enjoyable. Happy piercing!

Mastering Music: A Comprehensive Trumpet Fingering Chart for Beginners

Learning to play the trumpet can be an exciting journey! Whether you are just starting out or have some experience, knowing the proper fingerings is essential for creating beautiful music. In this blog post, we will provide you with a beginner-friendly trumpet fingering chart, tips on how to use it, and some important information that’ll make mastering the trumpet easier for you. What is a Trumpet Fingering Chart? A trumpet fingering chart is a helpful tool that shows which valves to press for different notes. The trumpet usually has three valves, and each combination of pressed valves produces a unique sound. As a beginner, you’ll want to familiarize yourself with these fingerings to play simple melodies effectively. Why is Learning Fingerings Important? Understanding Music: Knowing the fingerings helps you read music better. Playing Scales: Fingerings make it easier to practice scales. Improving Technique: Correct fingerings develop muscle memory in your fingers. Basic Trumpet Structure Before diving into the fingerings, let’s quickly look at the basic structure of the trumpet: Mouthpiece: Where you blow air to create sound. Valves: Three metal buttons that change the pitch when pressed. Bell: The wide opening at the end that amplifies the sound. Common Trumpet Notes and Their Fingerings Here’s a simple chart that shows some of the most common notes you will play on the trumpet and the valves you need to press. Note Valves C 0 D 1 + 3 E 1 F 1 + 2 G 0 A 1 + 2 B 2 C (high) 0 Explanation of the Fingering Chart 0: No valves pressed. 1: Press the first valve (closest to the mouthpiece). 2: Press the second valve (middle valve). 3: Press the third valve (farthest from the mouthpiece). The table lists the notes from middle C to high C, which are essential for beginners. Tips for Using the Fingering Chart Using the fingering chart is easy, but here are a few tips to make your practice sessions more effective: Practice Regularly: Set aside time each day to practice. Short sessions are often more beneficial than long, infrequent ones. Use a Mirror: Watching yourself play can help you maintain proper posture and technique. Play Slowly: Don’t rush. Start slowly, and gradually increase your speed as you become more comfortable. Listen to Others: Listen to trumpet players to understand how notes should sound. Practicing with the Chart Here are a few exercises you can do using the fingering chart: Scale Practice: Start with a C major scale. Play the notes ascending and descending. Note Identification: Randomly call out a note from the chart and play it without looking at the fingering. Lip Slurs: Try moving between notes with no fingers, focusing on your lips and air support. Common Mistakes to Avoid Even inexperienced trumpet players can make mistakes. Here are some common pitfalls and how you can avoid them: Pressing the Wrong Valves: Always double-check your valves. As you practice, try to memorize which notes you correspond to which fingerings. Poor Air Support: Make sure you are using enough air. This will not only improve sound quality but also make hitting higher notes easier. Holding the Trumpet Incorrectly: Ensure that you’re holding your trumpet comfortably. A tense grip can affect sound quality. Additional Resources To help you on your journey, consider these additional resources: Online Tutorials: Many YouTube channels offer beginner trumpet tutorials. Trumpet Method Books: Books such as “Arban’s Complete Conservatory Method for Trumpet” contain valuable exercises. Practice Apps: Music apps can help you learn notes and scales efficiently. Final Thoughts Mastering the trumpet takes time, patience, and practice. But with the proper fingering chart, you can simplify the learning process and enjoy making music. Remember to keep the chart handy while you practice, and don’t hesitate to reach out to teachers or fellow musicians for help. Now that you have this comprehensive trumpet fingering chart and some tips to practice, it’s time to pick up your trumpet and start making music! Happy playing! By focusing on beginner-friendly content and using key phrases like “trumpet fingering chart for beginners,” “learn to play trumpet,” and “trumpet practice tips,” we can help ensure this blog post ranks well in search engines. Enjoy your musical journey!

Understanding the 410A PT Chart: A Comprehensive Guide for HVAC Professionals

When it comes to HVAC (Heating, Ventilation, and Air Conditioning) systems, refrigerants play a crucial role. One of the most popular refrigerants is R-410A. In this guide, we’ll explore the R-410A PT (Pressure-Temperature) chart, which is essential for HVAC professionals. What is R-410A? R-410A is a blend of hydrofluorocarbons (HFCs) commonly used in residential and commercial air conditioning systems. It has become the go-to refrigerant since R-22, the previous standard, is being phased out due to its negative environmental impact. The Importance of the PT Chart The PT chart shows the relationship between the pressure and temperature of R-410A. Understanding this chart is vital for HVAC professionals for several reasons: Safety: Knowing the pressure limits helps prevent accidents. Efficiency: Correct values ensure systems run optimally. Diagnostics: Helps identify issues in HVAC systems. How to Read the PT Chart Before diving into the chart, let’s break down how to read it. The PT chart lists pressures that correspond to specific temperatures. It usually consists of two columns: one for pressure (in psi) and another for temperature (in degrees Fahrenheit). Example of R-410A PT Chart Temperature (°F) Pressure (PSI) 70 119 80 126 90 134 100 142 110 150 120 158 Note: This is a simplified version of the R-410A PT chart; always refer to a complete chart for precise applications. Using the PT Chart in HVAC Work Here are some practical applications of the R-410A PT chart in HVAC work: Charging the System: When adding refrigerant, use the chart to find the correct pressure for the current temperature. Ensure that the system is not overcharged, which can lead to inefficiencies. Troubleshooting: If a system isn’t cooling properly, check the pressures. Compare them against the PT chart for the current temperature. Look for discrepancies to diagnose the issue. System Maintenance: Regularly check pressures and temperatures to ensure the system operates effectively. Use the chart to identify potential maintenance needs. Key Insights from the R-410A PT Chart To enhance your understanding, here are some key points to remember: Pressure Increases with Temperature: The pressure of the refrigerant will rise as temperatures increase. It’s crucial to monitor this closely. Thermal Expansion: Changes in temperature can impact the refrigerant inside the system. Use the PT chart to maintain equilibrium for better performance. Emergency Situations: Knowing how to quickly read the chart can help in emergencies. Improper pressure management can lead to dangerous situations. Common Myths about the PT Chart Myth: All PT Charts are the Same Reality: Different refrigerants have unique charts. Always use the correct one for R-410A. Myth: The Chart is Unused in Modern HVAC Systems Reality: Understanding the PT chart is still essential, even with advanced technology. Closing Tips for HVAC Professionals Here are a few closing tips to help you work effectively with R-410A and the PT chart: Always Calibrate: Regularly check your pressure gauges for accuracy. Follow Safety Protocols: Handle refrigerants carefully to avoid leaks and health hazards. Stay Updated: Newer tools and technologies might enhance your ability to work with refrigerants, but foundational knowledge remains crucial. Conclusion Understanding the R-410A PT chart is vital for any HVAC professional. From charging systems to troubleshooting issues, this chart serves as a fundamental resource. By familiarizing yourself with the PT chart and using it effectively, you can improve safety, efficiency, and diagnostics in your HVAC practices. Key Takeaways R-410A is a widely-used refrigerant due to its environmental safety. The PT chart is essential for maintaining and diagnosing HVAC systems. Always consult a complete R-410A PT chart for accurate measurements. By keeping these points in mind, you’ll be fully equipped to work with R-410A in your HVAC projects. Happy cooling!

Finding the Perfect Fit: Your Ultimate Ski Size Chart Guide

When hitting the snowy slopes, having the right ski size is just as important as choosing the right gear. Skiing is not just about fun; it’s also about safety and comfort. The correct ski size can make a huge difference in your performance. In this guide, we will help you navigate ski sizes and give you an ultimate ski size chart. Understanding Ski Sizes Ski sizes are typically measured in centimeters and can range from about 130 cm to over 200 cm! The size of your ski affects how well you control your movement on the snow. Choosing the right ski size depends on several factors, including: Your Height Your Weight Your Skiing Ability The Type of Skiing You Plan to Do (like alpine skiing or freestyle skiing) Why Size Matters Control: A ski that’s too long can be hard to control, especially for beginners. Speed: Shorters skis can make it easier to turn but might not be as fast on flat sections. Safety: A proper fit can help prevent injuries. Ski Size Chart Here’s a simple ski size chart to guide you in choosing the right length based on your height and ability level. Your Height Beginner Skier Intermediate Skier Advanced Skier 4’10” – 5’0″ 130 – 145 cm N/A N/A 5’1″ – 5’3″ 140 – 155 cm 145 – 160 cm N/A 5’4″ – 5’6″ 150 – 165 cm 155 – 170 cm 160 – 175 cm 5’7″ – 5’9″ 155 – 170 cm 160 – 175 cm 170 – 180 cm 5’10” – 6’0″ 165 – 180 cm 175 – 185 cm 175 – 190 cm 6’1″ – 6’3″ 170 – 185 cm 180 – 195 cm 185 – 200 cm 6’4″ and above 180 – 195 cm 185 – 200 cm 195 cm and above How to Use the Size Chart Find your height in the left column. Determine your skiing ability (beginner, intermediate, advanced). Choose the recommended ski length. Factors Influencing Ski Size Beyond just height, here are other factors that might influence your ski size choice: Weight Matters: Heavier skiers may want longer skis for added stability. Skill Level: Beginners may benefit from shorter skis for better maneuverability. Terrain Type: For powder skiing, longer skis can provide better flotation, while shorter skis are more adept for terrain parks. Choosing the Right Ski Type It’s also crucial to choose the right type of ski for your style: All-Mountain Skis: Versatile skis that can handle various conditions. Freestyle Skis: Shorter skis designed for tricks and jumps. Powder Skis: Wider and longer, great for deep snow conditions. Tips for Picking the Right Ski Size Here are some tips to ensure you choose the right ski size for your next adventure: Get Fitted: Always try skis before purchasing them. Ski shops can often help. Consult Experts: Ski instructors can provide valuable advice on ski size based on skill level. Consider Your Goals: Think about where you plan to ski and what you want to achieve. Review Online Guides: Many ski brands offer sizing guides that are helpful. Buying Skis: What to Remember Budget: High-quality skis can be an investment, but shop around. New vs. Used: Used skis can be a cost-effective choice, but make sure to check their condition. Brand Consultation: Different brands can have different sizing standards. Conclusion Choosing the right ski size is an essential part of preparing for your day on the mountain. With the help of our size chart and tips, you can confidently select the perfect skis that will enhance your skiing experience. Remember, a good fit will lead to greater enjoyment, improved skills, and a safer ride down the slopes. Key Takeaways Always consult a ski size chart based on height and ability. Various factors like weight and terrain can influence ski size choice. Don’t hesitate to get professional advice at ski shops or from instructors. Now you’re ready to hit the slopes with the right equipment! Happy skiing!

The Ultimate Ski Boot Size Chart: Find Your Perfect Fit

When it comes to skiing, having the right equipment is crucial. One of the most important pieces of gear is your ski boots. A good fit ensures comfort, control, and an enjoyable day on the slopes. But how do you find the right size? This guide will help you understand ski boot sizing, and we’ve included a useful size chart to make your search easier! Understanding Ski Boot Sizes Ski boots come in various sizes, and understanding how they are sized can help you make the right choice. Ski boots are typically measured in Mondopoint, which refers to the length of your foot in centimeters. Factors to Consider When Choosing Ski Boots Foot Size: The size of your foot is the first thing to consider. Foot Width: Different boots cater to different foot widths. Skill Level: Beginners may prefer more comfort, while experts may seek performance. Ski Type: Different types of skiing might require different styles of boots. The Ski Boot Size Chart To assist you in picking the perfect size, refer to this ski boot size chart. Measure your foot from heel to toe, and compare it with the chart below. Mondopoint Size (CM) U.S. Men’s Size U.S. Women’s Size Foot Length (Inches) 22.0 5 6.5 8.67 22.5 5.5 7 8.83 23.0 6 7.5 8.97 23.5 6.5 8 9.13 24.0 7 8.5 9.27 24.5 7.5 9 9.43 25.0 8 9.5 9.57 25.5 8.5 10 9.83 26.0 9 10.5 9.96 26.5 9.5 11 10.12 27.0 10 11.5 10.27 27.5 10.5 12 10.43 28.0 11 12.5 10.59 28.5 11.5 13 10.75 29.0 12 13.5 10.91 Tips for Finding Your Perfect Ski Boot Fit Measure Your Feet Regularly: Feet can change over time. Measure them before your ski trip! Try Before You Buy: If possible, always try on boots before making a purchase. Different brands have different fits. Consider Socks: Wear the socks you plan to use while skiing when trying on the boots. This can alter the fit. Check the Width: Your foot width is as important as its length. Try boots marked as “narrow,” “medium,” or “wide” based on your foot shape. Stand and Flex: When trying on boots, stand and flex as you would while skiing. Your heel should stay in place without lifting. Common Ski Boot Fit Problems Even if you choose the right size, fit problems can still occur. Here are some common issues and what to do about them: Heel Lift: If your heel lifts when you flex, the boot may be too big. Look for a smaller size or a different model. Numb Toes: If your toes go numb, the fit might be too tight. Try a wider boot or adjust the buckles. Pressure Points: If you feel painful pressure, that could be a sign of improper sizing. Always make sure that the fit is snug but not painful. Additional Factors to Keep in Mind Skill Level: Always choose a boot that matches your skiing ability. Beginners may prefer softer boots, while advanced skiers may want stiffer options for better control. Seasonal Variation: Different seasons can impact how your feet feel in the boots. Check the fit prior to the ski season. Where to Buy Ski Boots Finding the right ski boots can be a challenge, but several options are available: Ski Shops: Local ski shops often have trained staff who can help you find the right size. Online Retailers: Websites often provide size charts and return policies. Ensure that you check customer reviews for sizing references. Rental Shops: If you’re new to skiing, consider renting boots at the ski resort to find your size before committing to a purchase. Conclusion Finding the perfect fit for your ski boots is essential for a great ski experience. Use the ski boot size chart and tips shared in this guide to ensure you make the right choice. Remember that a good fit will not only enhance your performance but also keep you comfortable throughout the day. Key Takeaways Use the Mondopoint sizing chart for accurate measurements. Consider your foot width and skiing style. Test boots in person when possible. Keep an eye on how the fit feels after wearing them for a while. Happy skiing! Whether you’re carving down the slopes or navigating through powder, your perfect ski boot awaits you!

The Ultimate Snowboard Size Chart: Find Your Perfect Fit

When it comes to snowboarding, choosing the right size board is super important. A properly sized snowboard will improve your ride, help you balance better, and make your experience more enjoyable. In this blog post, we will discuss how to find your perfect snowboard size using our easy-to-read snowboard size chart and give you tips to help you make the right choice. Why Snowboard Size Matters Selecting the right snowboard size can impact: Control: A board that’s too short or too long can be harder to control. Stability: The right fit helps you feel stable while riding. Comfort: A well-sized board feels better under your feet. Key Factors to Consider Before diving into the size chart, here are some important factors to consider: Rider’s Height: Taller riders usually need longer boards. Rider’s Weight: Heavier riders tend to require longer boards for proper support. Rider’s Skill Level: Beginners might prefer shorter boards for easier maneuverability. The Snowboard Size Chart Here’s an easy snowboard size chart to help you get started. It’s based on height and weight since these are the main factors in choosing a snowboard size. Rider Height (ft/in) Weight Range (lbs) Snowboard Length (cm) 4’10” – 5’2″ 80 – 120 130 – 140 5’2″ – 5’6″ 100 – 140 140 – 150 5’6″ – 5’10” 130 – 170 150 – 160 5’10” – 6’2″ 150 – 190 160 – 170 6’2″ – 6’5″ 180 – 220 170 – 180 Notes About the Chart The length is measured in centimeters (cm). The weight range is just a guideline. Skill level can alter your choice; beginners might want a shorter board. Choosing the Right Snowboard Width Another thing to consider is the snowboard’s width. Snowboards come in different widths to accommodate different foot sizes. Choosing the correct width makes a big difference. Standard Width vs. Wide Boards Standard Width Boards: Ideal for feet size 10 and below. Wide Boards: Great for foot sizes 10.5 and above to prevent “toe drag.” How to Measure Your Feet To find the right snowboard width, measure your foot from heel to toe in centimeters. A good rule of thumb is: If your foot is 10 inches (25.4 cm) or smaller: Choose a standard width. If your foot is bigger (10.5 inches or more): Look for a wide snowboard. Pole Length Matters Too Besides the snowboard, you will also need to consider the length of your snowboard pole. Here’s how to measure the right pole length: How to Choose Snowboard Pole Length Stand Up Straight: Hold the pole upside down. Bend Your Elbow: When you place the pole grip in your armpit, your elbow should create a 90-degree angle. Here’s a quick reference for pole length based on your height: Rider Height (ft/in) Pole Length (cm) 4’10” – 5’2″ 90 – 100 5’2″ – 5’6″ 100 – 110 5’6″ – 5’10” 110 – 120 5’10” – 6’2″ 120 – 130 6’2″ – 6’5″ 130 – 140 Additional Tips for Selecting Your Snowboard Try Before You Buy: Renting is a great way to test different snowboard sizes. Consult Experts: Talk to store staff for their opinions based on your skills and goals. Check Reviews: Look at feedback from other snowboarders who have a similar size. Think About Riding Style: Freestyle riders may prefer smaller boards, while all-mountain and freeride riders may choose longer boards. Conclusion Finding the right snowboard size is essential for a fun and exciting experience on the slopes. By considering your height, weight, foot size, and riding style, you can use our snowboard size chart to make the right choice. Remember, a correctly fitted snowboard will enhance your control, stability, and enjoyment while riding. So, are you ready to hit the slopes? Choose your snowboard wisely, and have an amazing time shredding the powder! Keywords for SEO Snowboard Size Chart Snowboard Size Guide Snowboard Length Snowboard Width Snowboard Fit By using SEO-friendly keywords, clear charts, and practical advice, we hope this guide helps you find your perfect snowboard fit. Happy snowboarding!

Cuprinol Garden Shades Colour Chart with PDF

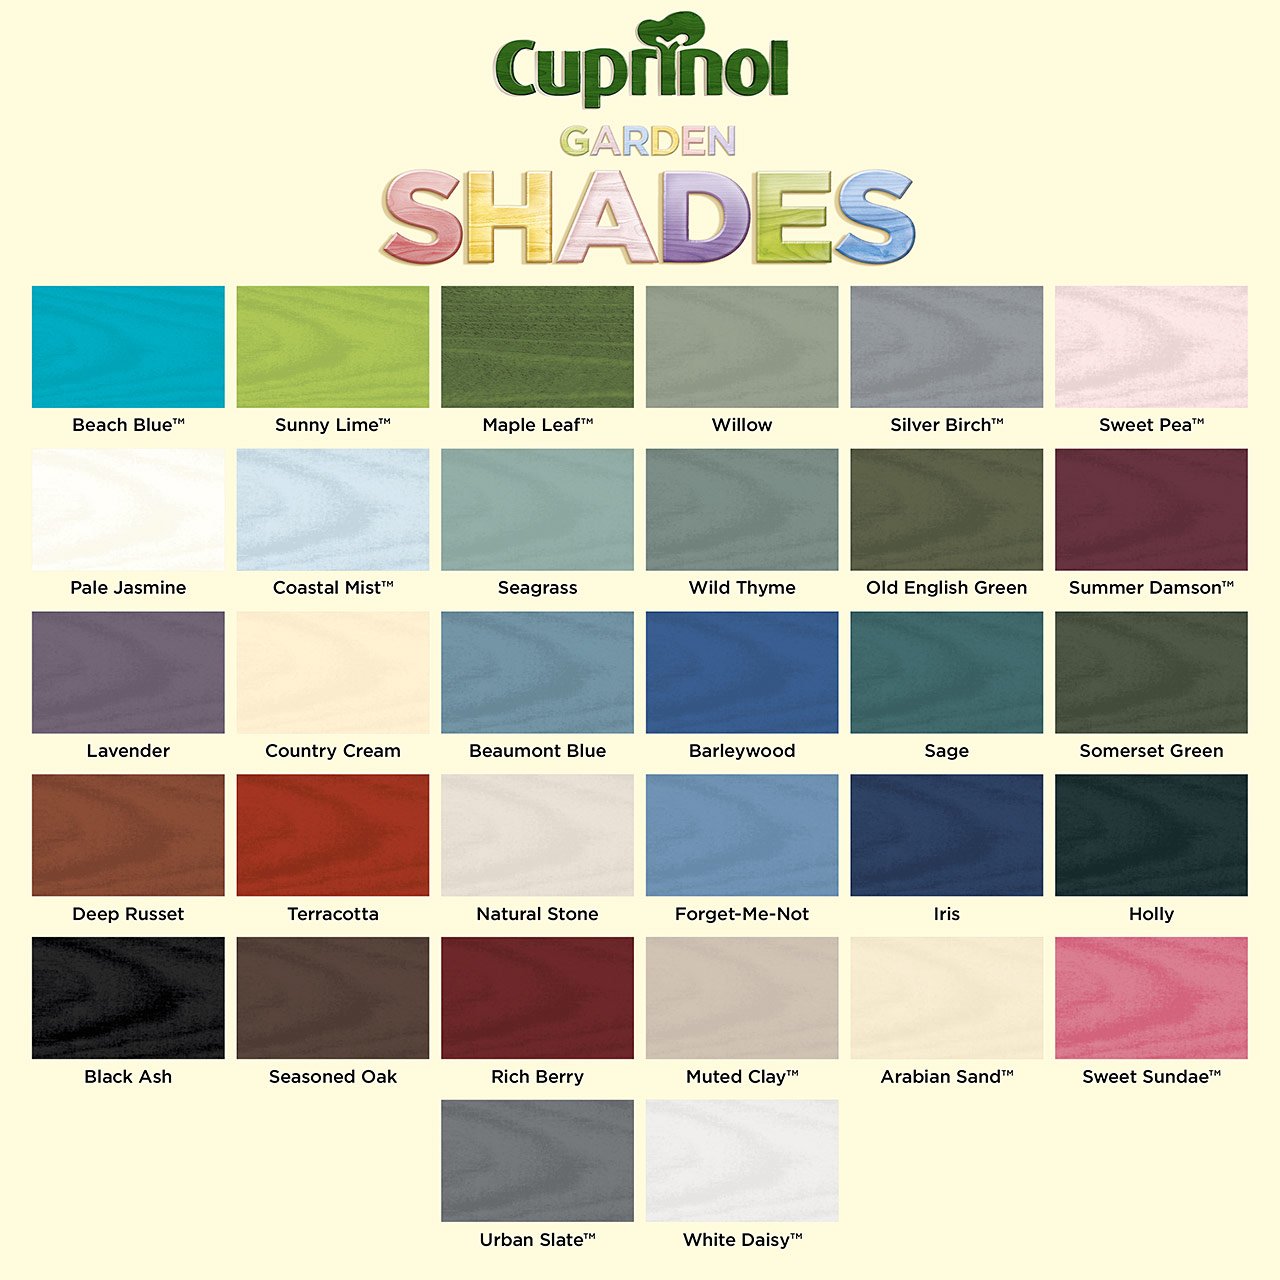
Cuprinol Garden Shades Colour Chart

Cuprinol Garden Shades is one of the many top choices of the customers who want to style up and protect the wood outdoor areas. This product has a variety of colors that are made to look like the color of nature. The article gives various choices, ranging from Cuprinol Garden Shades color chart, and provides the tips on how to identify the correct shade that suits your garden. Overview of Cuprinol Garden Shades Colour Chart Cuprinol Garden Shades are formulated to provide color as well as to protect wood constructions such as fences, sheds and garden furniture. Its unique formulation enables the natural texture of the wood to be visible while at the same time having a beautiful matte finish. The paint can be used on various surfaces, such as terracotta, brick, and stone, which make it a versatile choice for outdoor projects. Key Features: Exploring the Cuprinol Garden Shades Colour Chart The Cuprinol Garden Shades colour chart includes a diverse selection of shades that cater to different tastes and garden styles. Here are some notable colours from the chart: Colour Name Description Alpine Emerald A rich green reminiscent of lush landscapes. Barleywood A warm beige that complements natural wood tones. Beach Blue A soft, calming blue inspired by coastal scenes. Berry Kiss A vibrant pink that adds a pop of colour. Black Ash A deep, dark hue perfect for a modern look. Cornflower A bright blue that brings energy to any space. Forest Pine A classic green that evokes a woodland feel. Country Cream A soft cream ideal for creating a rustic ambiance. Choosing the Right Colour: Be sure to take these into account before finally picking a color from the Cuprinol Garden Shades’ chart: Application Tips To get the best possible results in the Cuprinol Garden Shades, simply apply the following tips: Conclusion The Cuprinol Garden Shades color chart renders a wide assortment of options, a rainbow of colors for you to change your outside oasis into a lively and welcoming area. However, to get closer to your desired result, you should know the advantages of each color and the application tips and make sure that the garden is still protected against all weather conditions. With Cuprinol Garden Shades, you can unleash your fantasy, as a garden becomes not just a green space but an expansion of your house personality. Be it soft pastels or vibrant gems, there is a perfect shade for you. Click here to Download Cuprinol Garden Shades Colour Chart Pdf Click Here to Download Cuprinol Garden Shades Colour Chart Pdf with Decoration Walls

Tenor Sax Fingering Chart: Check Tenor Saxophone Chart

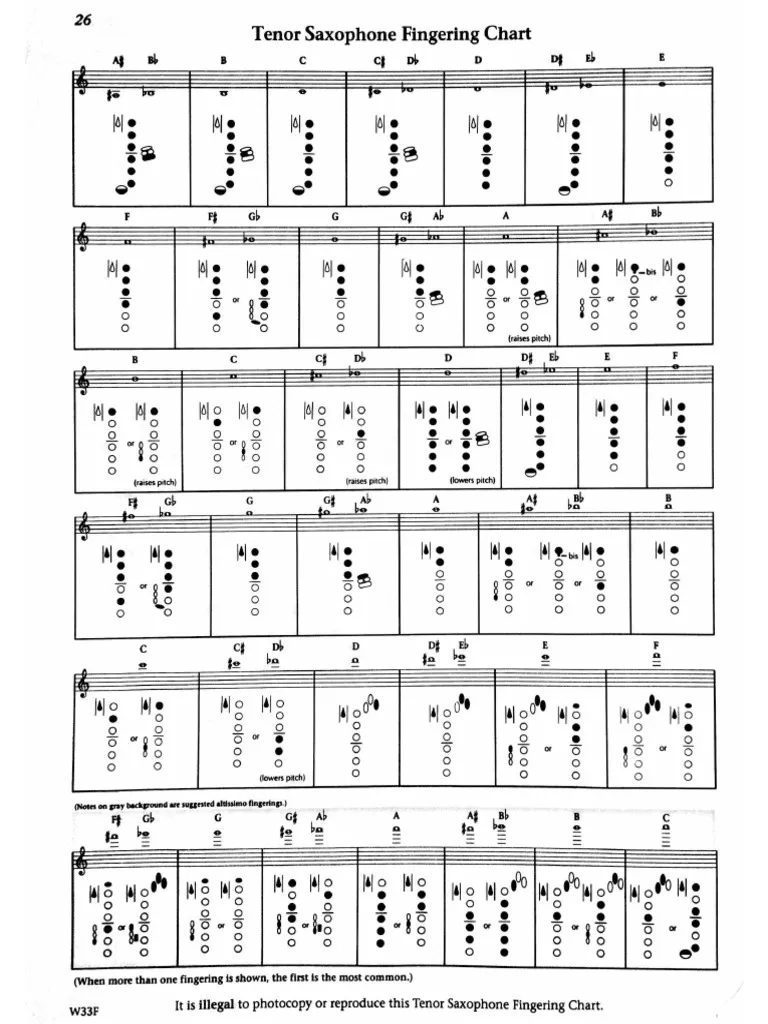
Tenor Sax fingering chart

The tenor saxophone is a popular instrument known for its rich, warm sound and versatility across various music genres. Whether you’re a beginner or an experienced player, understanding the fingering chart is essential for mastering the instrument. This article provides a comprehensive overview of the tenor sax fingering chart, helping you navigate the notes and improve your playing skills. What is a Tenor Sax Fingering Chart? A fingering chart is a visual guide that shows which keys to press on the saxophone to produce specific notes. Each note corresponds to a particular finger position, making it easier for players to learn and remember how to play different pitches. For beginners, this chart serves as an invaluable tool for developing muscle memory and improving overall technique. Understanding the Layout of the Tenor Sax Fingering Chart The tenor saxophone fingering chart can be broken down into several sections: Below is a simplified version of the tenor sax fingering chart: Note Left Hand Fingers Right Hand Fingers Low B 1 (Index) Low C 1 (Index) + 2 (Middle) Low C# 1 (Index) + 2 (Middle) + 3 (Ring) 4 (Pinky) Low D 1 (Index) + 2 (Middle) + 3 (Ring) E 1 (Index) + 2 (Middle) + 3 (Ring) + Octave Key F 1 (Index) + 2 (Middle) + Octave Key F# 1 (Index) + Octave Key + Side Key G 1 (Index) + Octave Key + Side Key A 1 (Index) + 2 (Middle) + Octave Key B 1 (Index) + 2 (Middle) + 3 (Ring) + Octave Key C 1 (Index) + 3 (Ring) + Octave Key D All fingers down with Octave Key pressed Basic Fingerings for Common Notes Here are some basic fingerings for common notes on the tenor saxophone: Altissimo Fingerings As you advance in your playing, you may want to explore altissimo fingerings, which allow you to reach higher notes. Here are some examples: Tips for Using the Tenor Sax Fingering Chart Conclusion The tenor sax fingering chart is an essential resource for any saxophonist, especially beginners. By familiarizing yourself with this chart and practicing regularly, you’ll develop greater confidence in your playing abilities. Remember that mastering fingerings takes time and patience, so keep practicing and enjoy making music with your tenor saxophone! This guide not only provides a clear understanding of how to read and use a tenor sax fingering chart but also emphasizes its importance in developing your skills as a musician. Happy playing!